Thursday, August 25, 2022

Speed-Raising Your Strawberry Crop!

 What can you do when your strawberry beds are pretty much played out, but you haven’t started any crowns for next year?

This summer, I found myself in this exact situation: our garden had only one strawberry bed (which was marginal at best), and the other three beds were completely petered out. This past spring, I had never found the time to buy any new crowns, much less plant them.

I was left with two options. I could either resign myself to no berries next spring…or start my own crowns!

But first, a little about growing strawberries:

Strawberries are one of those crops that require a fair amount of planning. In early spring, you plant bare-root strawberry crowns from the nursery, and keep your baby plants well-watered and mulched that summer and fall while they develop their root systems. Any flowers they produce, you pinch off—so the plant is continuing to put its energy in the roots, and not in fruiting.

The following spring, the now vigorous plants will begin to sprout flowers, and soon you’ll see fruit setting! Once established, the plants should bear for the next few seasons.

Strawberry runners in pots

Earlier this month, I blogged about trying a new strawberry-growing technique. This new (for me) method involved potting this summer’s strawberry runners.
Strong “mother” plant setting runners
I got the idea when I found a really vigorous volunteer in the garden that was producing gigantic berries. Not only that, but after bearing, this plant began sending out very sturdy runners, which were taking root nearby.  

Before I knew it, this plant had gifted me with at least eight new baby strawberry plants. A great start for next spring, they should eventually fill this bed. But eight plants is definitely not enough for a decent crop.

Then I noticed this strong “mother” plant was continuing to pump out additional runners, besides the ones that had already taken root. I had a brainwave: I could plant these new runner ends in pots, and let the roots develop in the pots. Once the roots of each plant were established, I could cut the runner, and replant the new plant in a fresh bed!

That’s exactly what I’ve done. Last week, I filled lots of little pots with garden soil and a little well-composted chicken manure for some organic matter. I then set a runner end into each pot.

In the photo, you’ll see little rocks in the pots. Long ago, John came up with the idea to weigh the runner end down with a small stone, so the runner has contact with the soil from the get-go, and that works even better.

Now producing crowns for another bed!

I do have one marginal strawberry bed—its best years are done, but the plants have sent out a few fairly good runners. So I started six more runner pots going in this bed, and today, I’ll check out a bunch of strawberry volunteers in my bee balm. If there are any runners worth potting, I’ll start some new plants there as well.

My plan for these pots: I’ll let the plants’ roots grow for the next month and a half, into early fall. Then, before the first frost in October, I’ll transplant the new crowns into a bed to winter over, top dressed with lots of compost and mulch. By spring (fingers-crossed) the new plants will be ready to start growing in earnest.

Instead of mourning a summer without strawberries in 2023, I’m now full of hope for a crop, and eager to see how well these home-grown crowns bear fruit!

Thursday, August 18, 2022

Recipe for Red Cabbage—Sweet ‘n Sour Chopped Salad

Chopped red cabbage salad
I love coleslaw. The sweeter and creamier the better.

I’ve tried lots of different coleslaw/cabbage salad methods, but the recipe here, using some of our newly harvested veggies, is my favorite by far. But first, a little background…

Back in the day, I made a super sweet/super sour coleslaw, with shredded cabbage, carrots, and a few green peppers. The recipe called for equal parts sugar and apple cider vinegar boiled into a near-syrup, so it certainly fit the sweet bill! 

But eating this slaw was sort of like mainlining sugar. The truth is, if I want something sweet, I’ll have cookies/cake/chocolate, etc!

Mayonnaise-y coleslaw, to me, is far tastier. Adding chopped carrots, sweet pickles, sweet onion and halved cherry tomatoes to the cabbage, with some salt and a few tablespoons of sugar in with the mayonnaise, and this combo is a dreamy mix of sweet and creamy.

But almost all mayonnaise is soy-based—I’ve tried all kinds of natural/organic brands, but they all seem to contain some soy. And soy gives me a stomachache.

So I pretty well gave up on mayo-based coleslaw. Last summer, I made a couple of batches of slaw with honey-mustard vinaigrette, and while it was okay, it wasn’t worth writing home about. I find cabbage has a very slight bitterness, and IMO, is not improved by a mustard and vinegar dressing.

My daughter was on a health kick for a while and was actually eating kale. It shouldn’t sound like a big deal, but she’d never before touched greens with a ten-foot pole! She shared a kale salad with us, made with a garlicky balsamic vinaigrette and walnuts, and though I was no huge kale fan, I found this salad’s sweet-sour quality quite tasty.

Even tasty enough to make myself! I started growing kale every summer and would make this salad regularly. I even brought the salad to a few potlucks and folks seemed to like it.

But given the cabbage worm problem (they LOVE kale), kale as a crop is very high maintenance. Schlepping row cover all through the growing season was just one more extra chore I didn't need.

And prepping kale is even more high-maintenance, what with de-stemming the leaves and rolling them up for slicing. Then, since kale doesn’t readily absorb dressing, you have to rub the leaves with a little dressing to soften them, before adding the rest of your dressing.  

Our garden chores at harvest time are non-stop, and a couple of years ago I got to a point where I just didn’t want to spend precious garden time growing, or cooking with kale. Kale and I were done.

This week, I had a head of red cabbage (organic store-bought) I was using for garnishing green salads. However, it would take the rest of the summer to use up the small head! Clearly, I needed to come up with some way to eat it while the cabbage was still fresh.

1st carrots of the summer this week!

I had fresh, crunchy garlic from the garden, a few newly-harvested carrots, and plenty of balsamic vinegar on hand.

Dressing: garlic, equal amounts vinegar and olive oil

Feeling inspired, I reprised my daughter’s recipe, substituting red cabbage for the kale.

Sweet ‘n Sour Chopped Cabbage Salad

Chopped cabbage

A couple of peeled, thinly sliced carrots

Vinaigrette made with a couple of cloves of minced garlic, blended into equal parts balsamic vinegar and olive oil.

Roasted walnuts, chopped, amount to your taste

Mix it all up, add a couple of handfuls of dried cranberries and mix again, then let the salad mellow in the fridge for a couple of hours. Delish!

And this salad is really good for you too! Besides the vitamins from the cabbage/carrots, you’ve got healthy fats from the olive oil and walnuts, and antioxidants from the garlic and cranberries. If you need to restrict your sodium, this salad is flavorful enough without salt. The dried cranberries contribute plenty of sweetness without added sugars.

It’s a make-ahead recipe too. What I like is that after a busy evening of watering/weeding/harvesting veggies, it’s nice not to come inside all tired and hungry for dinner, and also have to prep a bunch of vegetables. And the cabbage stays crunchy and colorful for days.

The salad recipes in the lifestyle magazines seem to be loaded with fresh, strongly flavored herbs like mint and cilantro. I confess, I like things pretty plain. But you can always add your own favorite touches to this salad. Diced celery, sweet peppers and cherry tomatoes will make it even tastier, and you can always sub in roasted almonds or sunflower nuts for the walnuts. 

Hope you give it a try and enjoy this taste of summer!

Thursday, August 11, 2022

Vertical Tomatoes and Other New Gardening Techniques

This summer, John and I are aiming to kick our efficiency and productivity up a notch in our food garden. He first saw vertical tomato growing on Pinterest this past winter, and we were both intrigued. 

Most tomatoes require staking of some kind. You might use commercial cages, or build some kind of support for each plant. All the years we’ve been raising tomatoes, John had created quite an elaborate structure for every plant with poles/small tree boughs going every which way, tying the poles and boughs together with string. Then tying the tomato plant to the structure as it grew. 

It works great, but efficient it is not! Tomato structure building and maintenance has been one of the more time-consuming chores in our food garden. Plus, when you keep all the side growth, you’ve got a large portion of the plant close to the ground. 

First of all, you end up with lots of tomatoes sitting on the soil. Second, all that growth near the ground encourages blight.

Vertical tomato structure
Vertical tomatoes have proved to be a vast improvement! You cut off the low and side growth, and train the plant upward. 

According to Brett L. Markam, author of “Mini-Farming: Self-Sufficiency on 1/4 Acre,” this vertical growth has what he calls a “3-D” effect on the plant: it can then grow in 3 dimensions, with increased access to sunlight and nutrients. 

It’s also very labor saving, compared to our previous structures. Once you’ve got your vertical pole and string in place, you just nip the side growth every once in a while and you’re good to go.

Another new-to-us method: raising onion sets. 

I’m not trying this on purpose—it’s more an unhappy accident: the onion seedlings I planted back in April were thriving…I’d kept them well-watered and mulched. Then in mid-July, I weeded them thoroughly. All good, right? But my fatal error: I didn’t water the bed immediately afterward.

Then we had a heat wave.

Well, those poor onions went straight downhill. I think I’d disturbed the roots too much—for onions you’re growing from seedlings, the roots are still really delicate even months after planting. Yesterday, I saw the tops of many onions were dying back—there was no chance for the bulbs to grow to a harvestable size.

So I decided to make lemonade out of lemons! I’ve harvested a few of the dead-top onions, which have very small bulbs. I’ll store them in a cool, well-ventilated spot, and plant them in early spring. I’ll let you know how it goes!

Strawberries…well, our crop this year was minuscule. The strawberries in the bed right under a solar panel didn’t like rainwater pouring down on them all winter and just gave up the ghost. The other 3 beds simply weren’t that productive—but I didn’t realize that until harvesting this June.

We should have replaced those beds back in early spring—August is definitely not the right time to put in new strawberry crowns for next year.

In our climate, you plant new strawberry crowns around March, for a June harvest the following year.  Since we dropped the ball this past spring (urgent family matters took us away from our place), we’ll be out of luck next June.

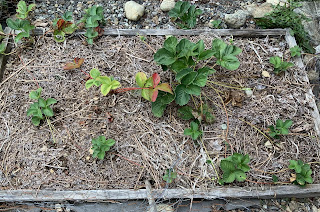
But wait! I (think) I’ve found an easy solution. One strawberry volunteer from the dead strawberry bed took up residence in the bed next to it and absolutely thrived. Then I noticed the plant put out lots of really strong runners this summer!

Those runners have rooted, creating new crowns! Here’s a pic of what will be my 2023 strawberries.

Plant in center sent out several strong runners

And happily, we’ve got strawberry volunteer plants all over the yard. Like I said, it’s not practical to try and transplant them. But, you can check for runners, clear a little spot for them to take root. Or, set the end of the runner in a pot of mixed soil and compost, and keep it watered. 

One of my chores today will be to locate more runners on my existing strawberry plants, and get those ends in pots. I’ll share a photo once they get going!

Wednesday, August 3, 2022

No-Bake Summer Dessert—Only 5 Ingredients!

If you're a cherry fan, Time Travel Kitchen, a delightful cooking newsletter, recently featured a sour cherry crumble, made with fresh cherries from Michigan. www.timetravelkitchen.substack.com

Jolene's beautiful photos of the glossy, ruby red fruit brought back memories of our backyard fruit trees of my Michigan late girlhood. But even better, the pics reminded me of my Michigander grandma-in-law’s epic dinners. 

Grandma Rahl was a stupendous cook, and would put on a country-style spread each and every Sunday afternoon—her big dining room table groaned under the weight of the pot roast, mashed potatoes, gravy, homemade biscuits, two vegetables, relishes, and salad.

But Grandma Rahl was most famous for her made-from-scratch desserts. Each Sunday, after I—and all the family—was stuffed to the gills, she would bring out the sweets: pies, cakes, Jello, cookies, you name it. There would be at least three. The pies especially stand out in my memory, but the one I loved best, and still make from time to time is a wonderfully quick recipe, perfect for summer: Cream Cheese Pie.

It’s one of those recipes passed down the generations: Grandma R.’s daughter, my beloved mother-in-law, made the pie regularly too, as did her older daughter. I made the pie frequently while my two daughters were growing up, and now it’s their go-to special occasion dessert.

Grandma R. and my MIL always topped hers with canned cherry pie filling—in fact, for many years the recipe was featured on pie filling label. But any kind of fresh, well-sweetened fruit sauce works nicely. The recipe is so simple you can make it from memory. And if you like the pie as is, unadorned (I do), it’s even easier!

Cream Cheese Pie

1 9-inch graham cracker crust

(I make mine from scratch, with 7 crushed organic graham crackers, two heaping tablespoons organic sugar, and ¼ cup melted butter. Combine well, then bake in a 350 degree oven for 10 minutes. This of course means the recipe is no longer “No-Bake,” but the scratch crust makes it extra special.)  

8 oz. cream cheese, softened (organic is nice)

1 14-oz. can sweetened condensed milk (organic is also nice)

1/3 cup lemon juice (RealLemon is easy; I use fresh lemons)

2 generous teaspoons vanilla extract

This dessert couldn’t be simpler:

My trusty old Sunbeam!
Cream the cream cheese until it’s soft and kind of fluffy, then mix in the condensed milk. If you’re doing it by hand, it can be pretty labor intensive to get out all the lumps.

I do most of my mixing by hand, but for cream cheese pie, I bring out the ancient Sunbeam hand mixer I’ve had since the 80s. My mom-in-law found it for me at a rummage sale, and it’s still going strong!

Anyway, once the cream cheese and condensed milk mixture is smooth, you add the lemon juice. Fold it in carefully—it’s used to set up the cheese and milk—and don’t overmix or the pie will be runny. While you’re finishing up your careful stirring, add the vanilla and combine.

Pour into the graham cracker crust—if you’re using a crust made from scratch, make sure it’s cool first. Then chill in the fridge for at least 3 hours.

The homemade crust has a tendency to stick in the pie pan. So getting the first piece out can be tricky, but even if it falls apart on the way to your dessert plate, it’s still super yummy.

I think of my lovely Michigan in-laws every time I make it—Grandma R. and my dear mother-in-law taught me everything I know about cooking!